Designing a weatherproof IoT device

There were a lot of challenges in delivering the Purple Martins project, and one of the thorniest was the hardware. Unlike software, there's no continuous integration of new hardware into the wild.
Electronics
Due solely to the time constraints of the project (8 weeks) - we had to be done-done by Earth Day, April 22nd - I made the choice almost immediately to build on top of the Raspberry Pi platform.
I specifically chose to work with the Raspberry Pi 3B for several reasons:
- The large ecosystem of supported components with wide availability
- Stable platform with broad commercial adoption.
- Microsoft Research had just recently published the Embedded Learning Library with targeted support for the RPi platform.
I briefly looked at other "bare metal" SoC boards from Espressif, Rockchip, OrangePi, Beaglebone, and others. But I knew we would end up spending more time writing firmware for the board than building solutions on top of it.
My hardware lead on the project, Andrew Reitano set to work finding the right mix of off-the-shelf components we could use that would meet our needs.

We elected for the following configuration:
- BME280 temperature and humidity sensor
- VL6180X time of flight sensor
- Pi-EzConnect shield
- Noctua NF-A4x10 fan
- Raspberry Pi Night vision camera (130deg fov, F1.8, 3.6mm focal length)
- 802.3AF Micro-USB Active POE Splitter
- Raspberry PI 3B
Environmental protection
I learned pretty quickly that there were going to be extra challenges with running any computer outside in the summer in Florida. I knew we'd need to add active cooling and would need to find a balance between ventilation and environmental isolation - we couldn't conformal coat the electronics, so keeping air moving would be critical to preventing moisture from oxidizing the boards.
I also had to be really careful about thermal isolation - these nests get HOT in the summer, and I had to ensure that any heat generated by the electronics would get exhausted outside and not build up in the nest. We ran a number of tests to measure the thermal load of the compute as well as the thermal load of the IR emitters for night vision.
For the enclosures themselves, after 3d printing, I put them through 5-6 coats of rubberized paint to ensure there could be no water penetration, and to resist any abrasions from wildlife that may take an interest.

Somewhat surprisingly, the devices held up without conformal coating. I chalk a lot of that up to the Pi folks making hardware they know people are going to put into all kinds of weird environments. At the end of our 4 month initial collection period, we'd only had a single Pi that needed to be replaced - and it appeared to be a failure cause by a faulty IR emitter, not weather related at all.
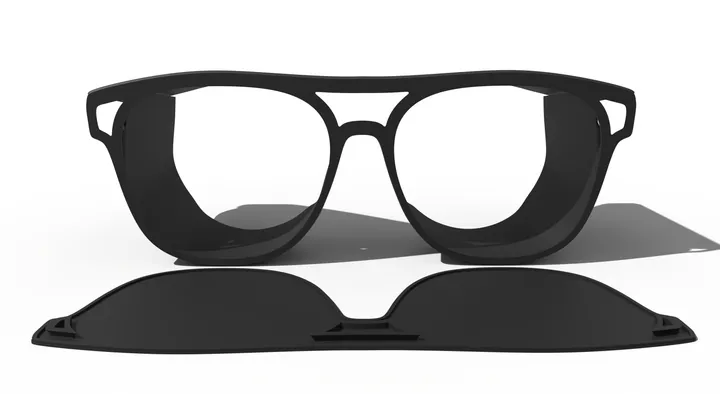
Enclosures
I had to design two enclosures. One for the nest entrance, and one for the interior. Jason provided me a gourd to take home, but I had to reverse engineer a CAD model for it.

The internal facing unit was relatively easy - match the screw cap, and place components accordingly. The front mount unit was a bit more difficult. We couldn't put any holes in the nests, everything had to be fully removable and serviceable. Mounting fixed objects to cylindrical surfaces is always a bit of a challenge.
Unlike a home project or PoC, I had to work on the assumption that these units could be in the field for years. As such I had to think about assembly, maintenance, repair, and replacement. The pieces were all designed specifically for 3D printing without any need for support or any advanced materials - so the Disney staff could replicate and replace units at any time.
I also had to create assembly instructions that could be used by my team as well as any future employees.
Gourd enclosure

Perch enclosure

Assembly

Building something once is easy. Building it multiple times gets really hard.
We only had to build 8 units - 4 nests with two compute units per nest. But it took the team a solid two days to get everything up and running the first time around.
There were a lot of moving pieces - on the hardware side, we didn't have test harnesses for each component (nor the time to make them). So we had to take a test-bench style approach - build the electronics and test the whole system.
Fortunately I took the advice of my colleagues Andrew and Bret Stateham, and we over-ordered every part by 50%. And sure enough there were bad modules and bad connectors that had to be swapped out. By the afternoon of assembly day 1, everything was mechanically ready.
Firmware and software lifecycle
I knew early on that we'd have to make sure these devices could be fully remotely managed and maintained.
Our initial plan was to use Microsoft IoT Edge - Essentially running a hypervisor on the Raspberry PI and containerizing everything into a single deployable docker image. Microsoft had recently published some guidance for doing this with the Pi 3B, so we went for it. However the team pretty quickly discovered it wasn't going to work for this project.
IoT Edge worked great for a lot of simple use-cases on the Pi. But the management and hypervisor layer incurs some memory and cpu overhead. In our case, the memory overhead was just a bit too much for us to be able to fit our ELL model on the device. With the Pi4 and beyond having multiple memory configuration options, this is no longer an issue.
So instead we opted for a more traditional, but less robust path of pushing packages to the device through a digital twin configuration in Azure IoT Hub. For pure software updates, this worked nearly perfectly from the start. Stage the code, build, test on the simulated digital twin, deploy to a lab device and test on device, then push to the wild if everything passes.
But we had a bunch of hardware, hardware that had multiple configurations across deployed devices. Hardware / software integration testing sucks. So we did the best we could for the time and resources available.

We got everyone in a room together and we stood up the entire network of devices end to end. It was painful, it took a couple of days, and the team fixed a TON of issues in a very short amount of time.
This could have easily taken weeks or months of ad-hoc bug filing, testing, and sprint cadence work. Sometimes a good ol' bug bash and hardware bring-up is the right way to go.
Deployment
For our first field test, we were able to run a single unit back to a very "hope facilities doesn't see this before we finish the test" PoE switch and wifi repeater.

But for the deployment, we had to have proper power runs. In a cruel twist of fate, one of the few locations of a Purple Martin nest on all of Disney properties didn't have nearby power happened to be right where we needed to install.
Thankfully, Disney is awesome, and the Parks organization trenched a power run right away. This ended up being the largest capital cost of the entire project.

Outcomes
Everything worked.

We had 4 nests with 8 compute units running for months in the wild, delivering back hundreds of hours of behavioral video, and thousands of data points capturing the exact timeline of the migration, nesting, mating, and fledging lifecycles for the Purple Martins.